This is the fourth part of a short series about auto responders in Mailster.
Last time we created a time-based autoresponder. Today we take a tour of the next type of autoresponders:
Action Hook Auto Responders
What are action hook autoresponders for?
While the other autoresponder types are pretty straightforward action hook auto responders are more advanced and require technical knowledge about WordPress coding and action hooks. They can be used for any kind of action and need to be triggered with some PHP code:
do_action( 'my_custom_hook' );Create a new Campaign

The content of your campaign mostly relies on its purpose. Just in any other campaign, you can use modules, tags, and custom HTML.
Define the delivery options for the autoresponder
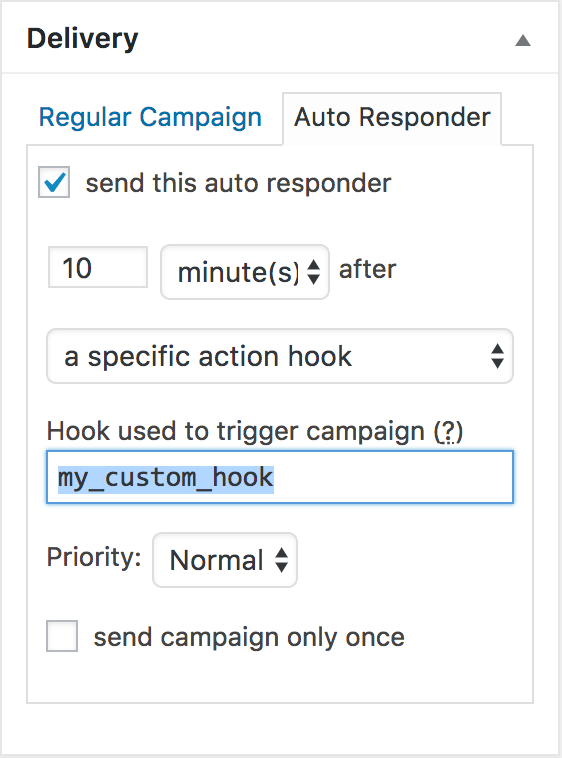
Select the Auto Responder tab in the Delivery Meta box. From the dropdown switch to “a specific action hook” to trigger the campaign when a certain action (“my_custom_hook” in our case) is executed.
The delay (10 Minutes) is for when the mails for the campaign are queued. If our action hook is called at 12:00 pm mails for this campaign are scheduled for 12:10 pm.
The Priority defines how quickly emails get sent. This is useful if you have many campaigns and emails queued and like to push them up in the queue.
If you “send campaign only once” each of your subscribers will get this campaign only once, no matter how often you trigger “my_custom_hook“.
If you uncheck this option every time the hook is called emails will be added to the queue but only if they are not already queued.
Define Receivers
Only subscribers who match the conditions from the receiver’s meta box will get this campaign. Make sure you use the correct conditions if you like to send only to a segment of your users. (more about segmentation)
Coding
This type of auto responder most likely requires some coding depending on what you like to achieve. Often you would like to send your campaign only to specific subscribers:
All subscribers must match the conditions in the receiver’s meta box!
Send to all subscribers
do_action( 'my_custom_hook' );Send to the subscriber with the ID 123
do_action( 'my_custom_hook', 123 );Send to subscribers with the ID 123, 456 and 789
do_action( 'my_custom_hook', array(123, 456, 789) );Read more about how to get the ID of the current subscriber here.
Adding data for Tags
You can also add custom data to be used in tags. So if you like to apply a custom subject line for instance add an associative array as the third parameter:
do_action( 'my_custom_hook', 123, array( 'subject' => 'My Custom Subject' ) );Wrapping third-party hooks
Almost every plugin uses its own hooks you can use. But keep in mind they may have wrong arguments which you cannot use directly. You have to wrap your custom hook in a function:
add_action( 'foreign_hook', function( $foreign_arg1, $foreign_arg2 ){
    do_action( 'my_custom_hook' );
}, 10, 2);
Examples
Based on the above settings and by using the custom action hook “my_custom_hook” here are some examples to get started. (Read more about adding custom code to your site here).
Trigger on a certain page
This triggers the campaign for the current user on the page with the slug “sample-page”.
add_action( 'template_redirect', function(){
    if ( is_page( 'sample-page' ) && $subscriber_id = mailster_get_current_user_id() ) {
        do_action( 'my_custom_hook', $subscriber_id );
    }
} );
Trigger after the user logs in
This triggers the campaign after the user has successfully logged in.
add_action( 'wp_login', function(){
   if ( $subscriber_id = mailster_get_current_user_id() ) {
       do_action( 'my_custom_hook', $subscriber_id );
   }
} );