General Idea
- A Mailster Template is a folder containing all individual Template Files and required assets.
- A Mailster Template can have multiple Template Files.
Structure
A Mailster Template includes at least two Template Files:
- index.html
- notification.html
You can add additional Template Files in this folder.
While the index.html file contains all available modules, the notification.html file contains only a text area that is used for notifications (e.g. confirmation, new subscriber info, and emails used by WordPress with the wp_mail() method.
Each Template File must include a header, similar to the header of a WordPress Theme:
<!--
    Template Name: Your Template Name
    Template URI: https://example.com
    Description: Some short description of your template
    Author: Your Name
    Author URI: https://example.com
    Version: 1.0
    Width: XXX
-->| Name | Info |
|---|---|
| Template Name | The Name of your Template |
| Name (optional) | The Name of your Template File |
| Template URI (optional) | The URL of your template |
| Description (optional) | A short description to describe your Template |
| Author | The name of the creator |
| Author URI (optional) | The URL of the creator |
| Version | current version number |
| Width (optional) | width of the template (Desktop) used for the module screenshots |
Each Template File is structured as follows:
- header
- modules
- module
- module
- …
- footer
The header and footer can also be inside the modules but only if a <module> tag is wrapping the HTML.
Example HTML
Let’s take a look at this example
<!--
    Template Name: Your Template Name
    Template URI: https://example.com
    Description: Some short description of your template
    Author: Your Name
    Author URI: https://example.com
    Version: 1.0
    Width: XXX
-->
<html>
    <head>
        <title>{subject}</title>
        <style>
            /* some styling here (will be inlined) */
        </style>
        <style data-embed>
            /* some styling here (will NOT be inlined) */
        </style>
    </head>
    <body>
        <modules>
            <module> </module>
            <module> </module>
        </modules>
    </body>
</html>
Inlining CSS
Mailster will automatically inline all your CSS declared in any <style> block in your document. You can prevent this by adding an embed-data attributed to the <style> tag:
<style data-embed>
    /* CSS declarations will not by inlined */
</style>
Preheader
Preheader is used to display short info in the preview pane of the email client
To make preheaders work correctly you have to add a {preheader} tag in your templates. Best is to wrap it in a div a hide it by default with CSS:
<div class="preheader">{preheader}</div>/* make sure the Preheader is hidden by default in all Email Clients */
div.preheader {
line-height: 0px;
font-size: 0px;
height: 0px;
display: none;
visibility: hidden;
}You can also inline styles directly:
<div style="line-height:0px;font-size:0px;height:0px;display:none;visibility:hidden;">
    {preheader}
</div>
Place the placeholder right after the open <body> tag if possible!
Webfonts
There are plenty of ways to use web fonts in email. Read The Ultimate Guide to Web Fonts for further info.
Here’s an example using the @import method to use web fonts as well as the data-embed attribute to prevent CSS inlining.
<style type="text/css" data-embed>
    @import url('https://fonts.googleapis.com/css?family=Roboto:400,700');
    @media only screen {
        h1,h2,h3,h4,h5,h6,
        table.textbutton a {
            font-family: 'Roboto', Helvetica, Arial, sans-serif !important;
        }
        table {
            font-family: 'Roboto', Helvetica, Arial, sans-serif !important;
        }
    }
</style>
Content and Modules
The content is often based on modules, but modules are not always required (the notification.html Template File doesn’t use modules).
Modules help to easily include prepared content blocks with images, text, or both. You can use any content inside modules (besides the ones that are not accepted, like iframe, oembed, scripts, etc).
Rules
The following rules apply to <modules> and <module> tags:
- Only use one
<modules>tag in a single Template File. - All
<module>Elements must be the first child of<modules>. <module>Elements must not contain other<module>elements.
A module starts with a <module> tag and ends with a closing </module> tag.
<module label="My Fancy Module"> ... // module content here </module>You should define a label to give your module a name!
You can use an active attribute to include the module automatically on new campaigns
<module label="My Fancy Module"> ... // module content here </module>Use the auto attribute to enable the magic wand on this module which helps users to add dynamic content to their posts.
<module label="My Fancy Module"> ... // module content here </module>You should name your modules depending on their content but you can use the same name more than once too. All modules must be inside a tag to work correctly:
<modules>
    <module label="My Fancy Module" auto> ... // module content here </module>

    <module label="My Second Module" auto> ... // module content here </module>

    <module label="Another Module" auto> ... // module content here </module>
</modules>
Adding three modules will add them to the Module Selector:
You can place a <style> blocks inside <module> tags. This way, you can use dedicated styles for certain <modules> only.
The CSS applies to the whole document and not only to the current module.
<module label="My Module">
    <style>
        /* place module related CSS here */
    </style>
    // content of your module here
</module>
Header & Footer
The header and footer can either be outside or inside the <modules> tag. If you put them inside the <modules> tag, the rules of modules apply. Make sure one of your headers and footers contains an active attribute like:
<module label="Header" type="header" active> // Header HTML here </module><module label="Footer" type="footer" active> // Footer HTML here </module>The header and Footer can also contain a type attribute that helps the editor place modules correctly.
You can have multiple Headers and Footers in your Template File
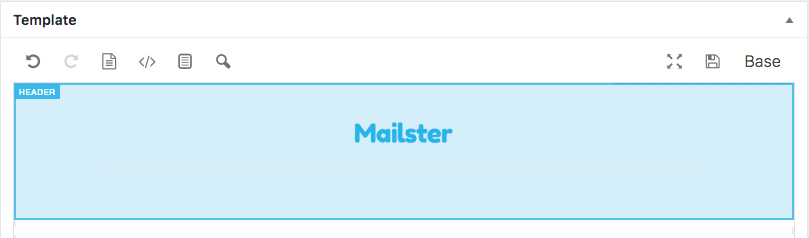
Header
A typical header should be present in new campaigns. DOCTYPE, <head> needs to be defined outside of the <modules> tag.
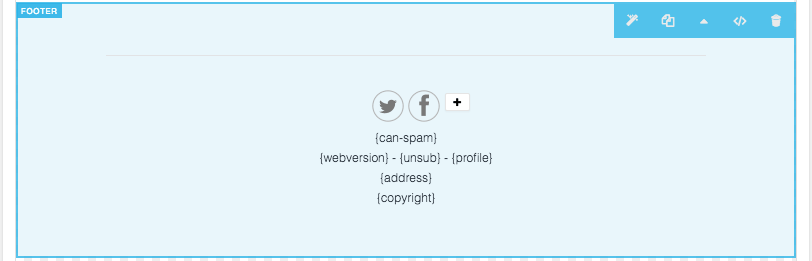
Footer
The Footer is similar to the header and is shown every time a new campaign is created. It often contains social links, copyright, and the CAN-SPAM Act (best as a tag).
Editable Content
You can now make individual modules but now you need to add editable regions to make them editable via the edit bar.
There are four types of editable content:
- Single Lines
- Multi Lines
- Images
- Buttons
Single Lines

Single-line elements are designed for inline elements.
To make single lines editable, just wrap a <single> tag around it:
<h1><single>Headline goes here</single></h1>You can (and should) also define a label for this element:
<h1><single label="My Headline">Headline goes here</single></h1>Single lines are made for short sentences, headlines, or other texts with a view word without the need for further formatting.
Multi Lines
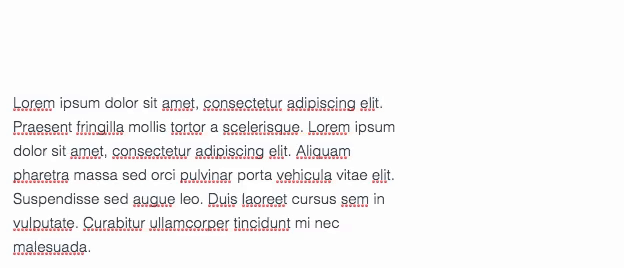
Multi-lines are similar to single lines but offer a rich text editor:
<multi label="My Body Text">
    <p>
        Lorem ipsum dolor sit amet, consectetur adipiscing elit. Praesent
        fringilla mollis tortor a scelerisque...
    </p>
</multi>
Multi-line should always be used when additional markups like font styles, colors, or additional headings are required. Some alignment options are only available if there’s a <p> tag as the first child of the element.
Images
To make an image editable, simply add an “editable” attribute to the element:
<img src="IMGSRC" editable />The label attribute works as well:
<img src="IMGSRC" editable label="My Image" />Buttons
Buttons are possible as single buttons or as button groups. All buttons need an editable attribute in the anchor tag.
Image Buttons
<a href="#" label="My Button" editable><img src="BTNIMG" /></a>Text Buttons
Text Buttons are easy to style and edit (You don’t have to upload a new image)
Simply wrap a table with a textbutton class around it:
<table class="textbutton" align="left">
    <tr>
        <td><a href="#" label="My Button" editable>Button Text</a></td>
    </tr>
</table>
The additional markup is required to style them with CSS and make them look (nearly) equally across email clients.
Button Groups
To group, buttons wrap all buttons into a <buttons> tag:
<buttons>
    <a href="#" label="My Button 1" editable><img src="BTNIMG_1" /></a>
    <a href="#" label="My Button 2" editable><img src="BTNIMG_2" /></a>
    <a href="#" label="My Button 3" editable><img src="BTNIMG_3" /></a>
</buttons>
Button groups allow to addition of multiple buttons next to each other.
Dynamic tags
Mailster supports a variety of tags {post_title:-1} that display dynamic content. Read more about tags here.
You can use them in your modules so users can use them right away. A module with content from the latest post post:-1 can look like this (simplified):
<module label="Latest Post Module" data-tag="{post:-1}" auto>
    <h1><single label="headline">{post_title:-1}</single></h1>
    <multi label="content">
        <p>{post_excerpt:-1}</p>
    </multi>
    <table class="textbutton" align="left">
        <tr>
            <td>
                <a href="{post_link:-1}" label="My Button" editable
                    >Button Text</a
                >
            </td>
        </tr>
    </table>
</module>
Note the data-tag="{post:-1}" attribute in the <module>.
Expected Fields
By default, Mailster will use the first <single> element for the post title and the first <multi> element for the post content or excerpt. You can set an expect attribute with additional parameters:
<single label="Post Date" expect="date">{post_date:-1}</single>No matter which posts the user likes to use, Mailster will always insert the date of this post in this field.
<single label="Author" expect="author">{post_author:-1}</single>Notification Template
The Notification template (notification.html) is used for
- opt-in messages
- Subscriber Notifications
wp_mail()– method (if enabled in the settings)
It’s a simpler version of your base Template File and must include at least two tags:
{headline}{content}
You should also include a {notification} tag that gets replaced with why and where users signed up.
Mailster will send a plain text email if no notification.html file is present in your template folder.
Placeholder Images
You can include all images within the final zip file. This is perfect for button images, social media images, and other required images.
For larger placeholder images, you can use the Mailsters dummy image service:
<img src="https://dummy.mailster.co/600x300.jpg" editable label="Your label" />Just use https://dummy.mailster.co/AAAxBBB.jpg while AAA is for the width in pixels and BBB is the height.
600 x 300

300 x 300

230 x 100

Only use the JPG file extension!
Tags
Mailster uses tags to show dynamic content. You can use the following tags in your template:
| Tag | Content |
|---|---|
{unsub} | unsubscribe link including an anchor tag |
{unsublink} | unsubscribe link |
{webversion} | web version link including anchor tags |
{webversionlink} | web version link |
{forward} | web version link including anchor tags to forward mail |
{forwardlink} | link to forward mail |
{profile} | adds a link to the profile page |
{profilelink} | link to profile page |
{subject} | subject |
{preheader} | preheader text |
{headline} | used for the headline in notification.html |
{content} | used for the content in notification.html |
{notification} | Adds a link to the profile page |
{copyright} | displays the copyright defined in the setting |
{email} | subscribers’ email address wrapped in an anchor tag |
{emailaddress} | subscribers email address |
{firstname} | subscribers first name |
{lastname} | subscribers last name |
{fullname} | subscribers full name |
{year} | current year (YYYY) |
{month} | current month (MM) |
{day} | current day (DD) |
You can find more tags you can use on our here.
File Structure
To help Mailster find all required files, you have to save them in certain folders. Here’s the general structure of the files:
- index.html
- notification.html
- custom-template.html
- img
- btn
- light
- light_buttonimage_01.png
- light_buttonimage_01.png
- ….
- dark
- dark_buttonimage_01.png
- dark_buttonimage_02.png
- ….
- buttonimage_01.png
- buttonimage_02.png
- …
- light
- social
- light
- light_socialimage_01.png
- light_socialimage_01.png
- …
- dark
- dark_socialimage_01.png
- dark_socialimage_02.png
- …
- socialimage_01.png
- socialimage_02.png
- ..
- light
- other-image.gif
- other-image.png
- other.image.jpg
- btn
- img
- colors.json
Please keep the folder structure and the naming convention so Mailster can show all files correctly.
You can add additional folders with images in the btn social folder. Each folder will show up as a tab in Mailster:
colors.json
To add an additional color schema on template upload, you can add a colors.json file which contains an array of color schemas:
[
    ["#F4F4F4", "#F8F8F8", "#F07800", "#787878", "#FFFFFF", "#E1E1E1"],
    ["#F4F4F4", "#F8F8F8", "#C36100", "#787878", "#FFFFFF", "#E1E1E1"],
    ["#F4F4F4", "#F8F8F8", "#BF8D1A", "#787878", "#FFFFFF", "#E1E1E1"],
    ["#F4F4F4", "#F8F8F8", "#9C186C", "#787878", "#FFFFFF", "#E1E1E1"],
    ["#F4F4F4", "#F8F8F8", "#A5183E", "#787878", "#FFFFFF", "#E1E1E1"]
]
colors.json only get imported if users upload the zip on the backend and not while uploading the structure via FTP
Limitations
HTML Email templates have a lot of limitations. This is mostly because of the email clients used which do not support the latest technology. To get an overview of which clients support certain functions, check out CampaignMonitor’s Guide to CSS support in the email.
Colors
Colors in Mailster get extracted from the Template File. Each color has its own purpose so you can’t use the exact same color for the text color and for the background color without changing them at the same time.
Only 6-digit color codes are recognized (#123456)
If you like to make a color unchangeable simply use three digits (#123) or color names (‘red’, ‘green’ blue’,…). Don’t use RGB or RGBA definitions cause they are not supported in all clients.
Background Images
While background images do not work properly for all clients you should prepare your template to work with them. Simple, wrap your email content into this table:
<body>
    <table width="100%" cellspacing="0" cellpadding="0">
        <tr>
            <td background="" align="center">// Your content here</td>
        </tr>
    </table>
</body>
If you define an empty background attribute in the first <td> Mailster can insert background images for the whole email. Some email clients may not display this image so make sure you set a proper background color as well.